Understanding the Diecast Finishing Process
The diecast finishing process is a crucial stage in the production of high-quality diecast models. It transforms raw metal castings into detailed, visually appealing replicas. This process encompasses a series of steps, from cleaning and surface preparation to painting, detailing, and applying protective coatings. Each step requires precision and skill to achieve the desired aesthetic and durability. The goal is to create a product that not only looks realistic but also withstands the test of time, ensuring the model remains a prized possession for collectors and enthusiasts for many years. Understanding each step is essential for anyone involved in the creation or appreciation of these intricate models.
Step 1 Cleaning and Preparation
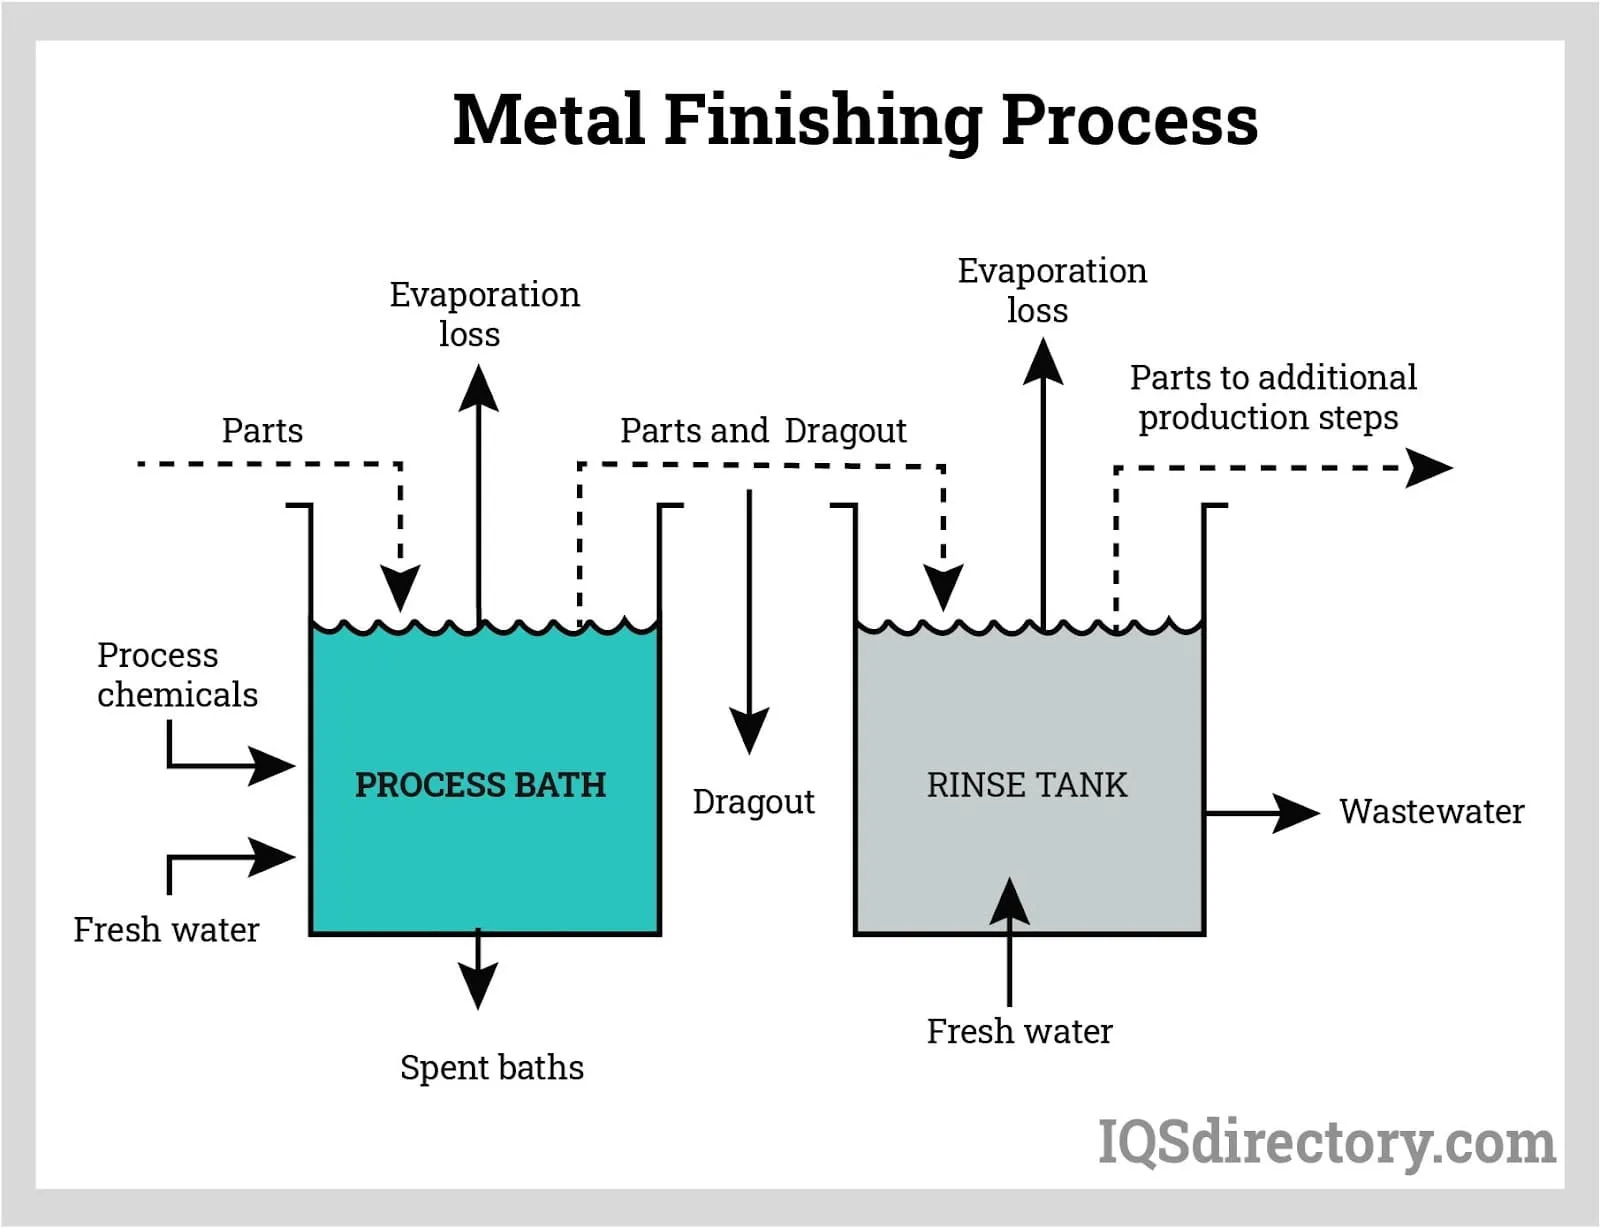
Before any finishing can begin, the diecast model must be thoroughly cleaned to remove any impurities. This step is fundamental because any dirt, oil, or residue will interfere with the subsequent steps, such as paint adhesion. Proper cleaning ensures a smooth, even surface, critical for a professional finish. This stage sets the foundation for the entire process and influences the final quality and appearance of the diecast model. The cleaning process helps to ensure the paint adheres properly, resulting in a more durable and visually appealing final product. This initial step can make or break the finishing process.
Surface Cleaning Techniques

Several techniques are employed for surface cleaning, depending on the specific contaminants present and the material of the diecast. Common methods include using ultrasonic cleaners, which use high-frequency sound waves to remove dirt and debris from hard-to-reach areas. Chemical cleaning, involving specialized solvents, is effective for removing oils and greases. Mechanical cleaning methods, like bead blasting, can also be used for more stubborn residues, but it requires careful control to avoid damaging the model’s surface. The correct cleaning method is chosen based on the specific needs of the model and type of contamination present.
Preparation for Finishing
Once cleaned, the diecast model needs to be prepared for the next stages. This includes inspecting the surface for any imperfections, such as burrs or flash from the casting process. These imperfections are removed using specialized tools. The model is often lightly sanded to create a slightly rough surface, which helps the primer and paint to adhere better. This preparation step ensures that the subsequent layers of paint and coatings adhere properly. It also contributes to the overall smoothness and aesthetics of the final product.
Step 2 Surface Treatment
Surface treatment enhances the model’s surface, improving its properties for painting and overall durability. This step is essential for ensuring the longevity and aesthetic quality of the finished product. Surface treatment prepares the metal surface to accept the subsequent layers of finish. Proper surface treatment is often the key to a high-quality diecast model. This step lays the groundwork for a durable and visually appealing finish.
Types of Surface Treatments

Common surface treatments include chemical conversion coatings and abrasive blasting. Chemical conversion coatings, such as chromate conversion, create a protective layer that improves paint adhesion and corrosion resistance. Abrasive blasting, using materials like sand or glass beads, removes imperfections and creates a slightly textured surface for better paint adhesion. These treatments are chosen based on the specific material of the diecast, the desired finish, and the environmental conditions the model will be exposed to. The goal is to optimize the surface for the paint and protective layers.
Importance of Surface Treatment
Surface treatment is critical for several reasons. It enhances the adhesion of paint, preventing chipping and flaking. It also improves corrosion resistance, protecting the model from rust and degradation. Furthermore, some treatments provide a more uniform surface, leading to a smoother and more professional paint finish. By improving the surface, the model will last longer and maintain its appearance. Without proper surface treatment, the paint may not adhere correctly, and the model could be vulnerable to damage.
Step 3 Primer Application
Primer application is a crucial step in the diecast finishing process. The primer acts as an intermediary layer between the metal surface and the paint, providing a base for the paint to adhere to. Primers not only improve paint adhesion but also help to fill minor imperfections, creating a smoother surface. This leads to a higher-quality paint finish and improves the overall durability of the model. Applying primer is often a balance of preparation and execution. A well-applied primer can make all the difference in the finished appearance.
Types of Primers

Various types of primers are used in diecast finishing, each with unique properties. Epoxy primers are known for their excellent adhesion and corrosion resistance, making them suitable for demanding applications. Acrylic primers offer good flexibility and are easier to sand, making them ideal for achieving a smooth surface. Etching primers are designed to bond directly to metal surfaces, providing superior adhesion. The choice of primer depends on the specific requirements of the diecast model, the type of paint to be used, and the desired finish. Selecting the right primer is crucial for achieving a durable and attractive finish.
Application Techniques
Primers are typically applied using spray guns or airbrushes to achieve an even coat. The application process involves careful control of the spray pattern, pressure, and distance to ensure uniform coverage. Multiple thin coats are often applied instead of a single thick coat to prevent runs and drips. The model should be allowed to dry completely between coats. Proper application techniques are essential to avoid defects and ensure a smooth, even surface for the paint. This attention to detail will lead to a professional and long-lasting finish.
Step 4 Painting
Painting is where the diecast model truly comes to life, transforming from a raw casting into a detailed replica. This step requires precision, skill, and attention to detail. The choice of paint, the application method, and the overall finish all contribute to the final appearance of the model. The selection of colors, application of layers, and fine details create the realistic look of a diecast model. The painting stage is often considered the most crucial step in achieving a high-quality finish, bringing the model to life with color and detail.
Paint Types for Diecast

Several paint types are suitable for diecast models, each with its advantages and disadvantages. Enamel paints provide a durable and glossy finish, ideal for creating realistic appearances. Acrylic lacquers dry quickly and are easy to apply, offering a wide range of colors. Urethane paints are known for their excellent durability and chemical resistance, providing a long-lasting finish. The choice of paint depends on the desired finish, the level of detail required, and the application methods available. Careful selection ensures the model looks its best and lasts a long time.
Painting Methods
Painting methods range from hand-painting details to using advanced spray-painting techniques. Spray guns and airbrushes are commonly used to apply paint evenly, ensuring a smooth finish. Multiple thin coats are typically applied to achieve the desired color and depth. Hand-painting is often employed for detailed work and intricate designs, requiring precision and patience. The painting process includes masking and applying multiple colors, details and clear coats. Proper preparation and application techniques are essential for a professional-looking finish.
Step 5 Detailing
Detailing is a critical step in the diecast finishing process, bringing the model to life with realistic features and intricate designs. This stage involves adding fine details that enhance the model’s appearance and accuracy. Detailing requires precision and skill, often utilizing specialized tools and techniques to achieve the desired level of realism. Detailing can involve intricate painting, decals, and adding components that contribute to the model’s realistic look.
Detailing Techniques
Various detailing techniques are used to create realistic features. This includes adding paint details like stripes, logos, and markings using fine brushes or stencils. Decals are applied to add complex designs and intricate graphics. Weathering techniques, such as washes and dry brushing, are employed to simulate the effects of wear and tear. These techniques are used to simulate dirt, rust, and other environmental effects, increasing the realism of the model. A key element is careful execution and a steady hand to achieve the desired level of detail.
Detailing Tools
Specialized tools are essential for detailing. These include fine-tipped brushes, precision airbrushes, and various types of paint and weathering products. Magnifying glasses or head-worn magnifiers are often used to enhance visibility. Tweezers and other precision tools are used for handling small parts. The choice of tools depends on the level of detail required and the complexity of the design. Using the right tools allows the modeler to achieve precision and accuracy in detailing.
Step 6 Protective Coating
Protective coatings are applied to safeguard the finished diecast model from damage and environmental factors. These coatings provide a barrier against scratches, UV damage, and other forms of wear. They also enhance the model’s appearance by adding gloss or a matte finish. Protective coatings are applied after all painting and detailing are complete and are a critical step in ensuring the longevity and visual appeal of the model. They protect the intricate details and preserve the model’s beauty.
Types of Protective Coatings

Clear coats are commonly used to protect the paint and decals. Gloss clear coats provide a shiny, reflective finish, while matte clear coats offer a non-reflective appearance. UV-resistant coatings are particularly important, protecting the model from fading and damage caused by sunlight. Other specialized coatings can provide scratch resistance or chemical resistance. The type of coating depends on the desired finish and level of protection required. Careful selection can ensure the model retains its appearance for years.
Application of Protective Coatings
Protective coatings are typically applied using spray guns or airbrushes, creating a smooth, even layer over the paint and details. Multiple thin coats are often applied to achieve the desired level of protection. It is crucial to apply the coating in a dust-free environment to prevent imperfections. Proper application techniques are essential for ensuring the coating adheres correctly and provides optimal protection. This will enhance the model’s appearance and extend its lifespan.
Step 7 Quality Control and Inspection
Quality control and inspection are the final steps in the diecast finishing process. This ensures that the model meets the required standards for appearance, durability, and accuracy. These steps are vital for identifying and correcting any defects or imperfections. Inspection is performed throughout the finishing process, but the final inspection verifies that all steps are executed correctly. Proper quality control is essential for delivering high-quality diecast models.
Inspection Methods

Inspection methods involve visual examination, checking for defects such as paint runs, scratches, and misaligned decals. Dimensional checks are used to verify that the model’s dimensions and proportions are correct. Testing the durability of the finish, such as scratch resistance, may also be performed. Inspection may also include checking for alignment of details. Inspection is a combination of visual and objective checks. The objective is to ensure that the final product meets the customer’s quality standards.
Common Defects and Solutions
Common defects include paint runs, dust particles, and imperfections in the decals. Paint runs can be corrected by sanding and repainting, while dust particles can be removed through careful cleaning and polishing. Misaligned decals are replaced. Identifying and correcting these defects is a critical part of the quality control process. By addressing these issues, the manufacturer can ensure that each model meets the required standards and provides customer satisfaction. The ultimate goal is to deliver a perfect product.